.png.6dd3056f38e93712a18d153891e8e0fc.png.1dbd1e5f05de09e66333e631e3342b83.png.933f4dc78ef5a5d2971934bd41ead8a1.png)
Search the Community
Showing results for tags 'ai accelerators'.
Found 3 results
-
 If you have an NVIDIA GPU installed on your Proxmox VE server, you can pass it to a Proxmox VE LXC container and use it in the container for CUDA/AI acceleration (i.e. TensorFlow, PyTorch). You can also use the NVIDIA GPU for media transcoding, video streaming, etc. in a Proxmox VE LXC container with the installed Plex Media Server or NextCloud (for example). In this article, we will show you how to passthrough an NVIDIA GPU to a Proxmox VE 8 LXC container so that you can use it for CUDA/AI acceleration, media transcoding, or other tasks that require an NVIDIA GPU. Topic of Contents: Installing the NVIDIA GPU Drivers on Proxmox VE 8 Making Sure the NVIDIA GPU Kernel Modules Are Loaded in Proxmox VE 8 Automatically Creating a Proxmox VE 8 LXC Container for NVIDIA GPU Passthrough Configuring an LXC Container for NVIDIA GPU Passthrough on Promox VE 8 Installing the NVIDIA GPU Drivers on the Proxmox VE 8 LXC Container Installing NVIDIA CUDA and cuDNN on the Proxmox VE 8 LXC Container Checking If the NVIDIA CUDA Acceleration Is Working on the Proxmox VE 8 LXC Container Conclusion References Installing the NVIDIA GPU Drivers on Proxmox VE 8 To passthrough an NVIDIA GPU to a Proxmox VE LXC container, you must have the NVIDIA GPU drivers installed on your Proxmox VE 8 server. If you need any assistance in installing the latest version of the official NVIDIA GPU drivers on your Proxmox VE 8 server, read this article. Making Sure the NVIDIA GPU Kernel Modules Are Loaded in Proxmox VE 8 Automatically Once you have the NVIDIA GPU drivers installed on your Proxmox VE 8 server, you must make sure that the NVIDIA GPU kernel modules are loaded automatically at boot time. First, create a new file like “nvidia.conf” in the “/etc/modules-load.d/” directory and open it with the nano text editor. $ nano /etc/modules-load.d/nvidia.conf Add the following lines and press <Ctrl> + X followed by “Y” and <Enter> to save the “nvidia.conf” file: nvidia nvidia_uvm For the changes to take effect, update the “initramfs” file with the following command: $ update-initramfs -u For some reason, Proxmox VE 8 does not create the required NVIDIA GPU device files in the “/dev/” directory. Without those device files, the Promox VE 8 LXC containers won’t be able to use the NVIDIA GPU. To make sure that Proxmox VE 8 creates the NVIDIA GPU device files in the “/dev/” directory at boot time, create a udev rules file “70-nvidia.rules” in the “/etc/udev/rules.d/” directory and open it with the nano text editor as follows: $ nano /etc/udev/rules.d/70-nvidia.rules Type in the following lines in the “70-nvidia.rules” file and press <Ctrl> + X followed by “Y” and <Enter> to save the file: # create necessary NVIDIA device files in /dev/* KERNEL=="nvidia", RUN+="/bin/bash -c '/usr/bin/nvidia-smi -L && /bin/chmod 0666 /dev/nvidia*'" KERNEL=="nvidia_uvm", RUN+="/bin/bash -c '/usr/bin/nvidia-modprobe -c0 -u && /bin/chmod 0666 /dev/nvidia-uvm*'" For the changes to take effect, reboot your Proxmox VE 8 server as follows: $ reboot Once your Proxmox VE 8 server boots, the NVIDIA kernel modules should be loaded automatically as you can see in the following screenshot: $ lsmod | grep nvidia The required NVIDIA device files should also be populated in the “/dev” directory of your Proxmox VE 8 server. Note the CGroup IDs of the NVIDIA device files. You must allow those CGroup IDs on the LXC container where you want to passthrough the NVIDIA GPUs from your Proxmox VE 8 server. In our case, the CGroup IDs are 195, 237, and 226. $ ls -lh /dev/nvidia* $ ls -lh /dev/dri Creating a Proxmox VE 8 LXC Container for NVIDIA GPU Passthrough We used an Ubuntu 22.04 LTS Proxmox VE 8 LXC container in this article for the demonstration since the NVIDIA CUDA and NVIDIA cuDNN libraries are easy to install on Ubuntu 22.04 LTS from the Ubuntu package repositories and it’s easier to test if the NVIDIA CUDA acceleration is working. If you want, you can use other Linux distributions as well. In that case, the NVIDIA CUDA and NVIDIA cuDNN installation commands will vary. Make sure to follow the NVIDIA CUDA and NVIDIA cuDNN installation instructions for your desired Linux distribution. If you need any assistance in creating a Proxmox VE 8 LXC container, read this article. Configuring an LXC Container for NVIDIA GPU Passthrough on Promox VE 8 To configure an LXC container (container 102, let’s say) for NVIDIA GPU passthrough, open the LXC container configuration file from the Proxmox VE shell with the nano text editor as follows: $ nano /etc/pve/lxc/102.conf Type in the following lines at the end of the LXC container configuration file: lxc.cgroup.devices.allow: c 195:* rwm lxc.cgroup.devices.allow: c 237:* rwm lxc.cgroup.devices.allow: c 226:* rwm lxc.mount.entry: /dev/nvidia0 dev/nvidia0 none bind,optional,create=file lxc.mount.entry: /dev/nvidiactl dev/nvidiactl none bind,optional,create=file lxc.mount.entry: /dev/nvidia-modeset dev/nvidia-modeset none bind,optional,create=file lxc.mount.entry: /dev/nvidia-uvm dev/nvidia-uvm none bind,optional,create=file lxc.mount.entry: /dev/nvidia-uvm-tools dev/nvidia-uvm-tools none bind,optional,create=file lxc.mount.entry: /dev/dri dev/dri none bind,optional,create=dir Make sure to replace the CGroup IDs in the “lxc.cgroup.devices.allow” lines of the LXC container configuration file. Once you’re done, press <Ctrl> + X followed by “Y” and <Enter> to save the LXC container configuration file. Now, start the LXC container from the Proxmox VE 8 dashboard. If the NVIDIA GPU passthrough is successful, the LXC container should start without any error and you should see the NVIDIA device files in the “/dev” directory of the container. $ ls -lh /dev/nvidia* $ ls -lh /dev/dri Installing the NVIDIA GPU Drivers on the Proxmox VE 8 LXC Container NOTE: We are using an Ubuntu 22.04 LTS LXC container on our Proxmox VE 8 server for demonstration. If you’re using another Linux distribution on the LXC container, your commands will slightly vary from ours. So, make sure to adjust the commands depending on the Linux distribution you’re using on the container. You can find the NVIDIA GPU drivers version that you installed on your Proxmox VE 8 server with the “nvidia-smi” command. As you can see, we have the NVIDIA GPU drivers version 535.146.02 installed on our Proxmox VE 8 server. So, we must install the NVIDIA GPU drivers version 535.146.02 on our LXC container as well. $ nvidia-smi First, install CURL on the LXC container as follows: $ apt update && apt install curl -y CURL should be installed on the LXC container. To install the NVIDIA GPU drivers version 535.146.02 (let’s say), export the NVIDIA_VERSION environment variable and run the CURL command (on the container) to download the required version of the NVIDIA GPU drivers installer file. $ export NVIDIA_VERSION="535.146.02" $ curl -O "https://us.download.nvidia.com/XFree86/Linux-x86_64/${NVIDIA_VERSION}/NVIDIA-Linux-x86_64-${NVIDIA_VERSION}.run" The correct version of the NVIDIA GPU drivers installer file should be downloaded on the LXC container as you can see in the following screenshot: Now, add an executable permission to the NVIDIA GPU drivers installer file on the container as follows: $ chmod +x NVIDIA-Linux-x86_64-535.146.02.run To install the NVIDIA GPU drivers on the container, run the NVIDIA GPU drivers installer file with the “–no-kernel-module” option as follows: $ ./NVIDIA-Linux-x86_64-535.146.02.run --no-kernel-module Once you see this option, select “OK” and press <Enter>. Select “OK” and press <Enter>. Select “Yes” and press <Enter>. Select “OK” and press <Enter>. The NVIDIA GPU drivers are being installed on the LXC container. It takes a few seconds to complete. Once you see this prompt, select “Yes” and press <Enter>. Select “OK” and press <Enter>. The NVIDIA GPU drivers should be installed on the LXC container. To confirm whether the NVIDIA GPU drivers are installed and working, run the “nvidia-smi” command on the LXC container. As you can see, the NVIDIA GPU driver version 535.146.02 (the same version as installed on the Proxmox VE 8 server) is installed on the LXC container and it detected our NVIDIA RTX 4070 GPU correctly. $ nvidia-smi Installing NVIDIA CUDA and cuDNN on the Proxmox VE 8 LXC Container NOTE: We are using an Ubuntu 22.04 LTS LXC container on our Proxmox VE 8 server for demonstration. If you’re using another Linux distribution on the LXC container, your commands will slightly vary from ours. So, make sure to adjust the commands depending on the Linux distribution you’re using on the container. To install NVIDIA CUDA and cuDNN on the Ubuntu 22.04 LTS Proxmox VE 8 container, run the following command on the container: $ apt install build-essential nvidia-cuda-toolkit nvidia-cudnn To confirm the installation, press “Y” and then press <Enter>. The required packages are being downloaded and installed. It takes a while to complete. Once you see this window, select “OK” and press <Enter>. Select “I Agree” and press <Enter>. The installation should continue. The installer is downloading the NVIDIA cuDNN library archive from NVIDIA. It’s a big file, so it takes a long time to complete. Once the NVIDIA cuDNN library archive is downloaded, the installation should continue as usual. At this point, NVIDIA CUDA and cuDNN should be installed on the Ubuntu 22.04 LTS Proxmox VE 8 LXC container. Checking If the NVIDIA CUDA Acceleration Is Working on the Proxmox VE 8 LXC Container To verify whether NVIDIA CUDA is installed correctly, check if the “nvcc” command is available on the Proxmox VE 8 container as follows: $ nvcc --version As you can see, we have NVIDIA CUDA 11.5 installed on our Proxmox VE 8 container. Now, let’s write, compile, and run a simple CUDA C program and see if everything is working as expected. First, create a “~/code” project directory on the Proxmox VE 8 container to keep the files organized. $ mkdir ~/code Navigate to the “~/code” project directory as follows: $ cd `/code Create a new file like “hello.cu” in the “~/code” directory of the Proxmox VE 8 container and open it with the nano text editor: $ nano hello.cu Type in the following lines of code in the “hello.cu” file: #include <stdio.h> __global__ void sayHello() { printf("Hello world from the GPU!\n"); } int main() { printf("Hello world from the CPU!\n"); sayHello<<1,1>>(); cudaDeviceSynchronize(); return 0; } Once you’re done, press <Ctrl> + X followed by “Y” and <Enter> to save the “hello.cu” file. To compile the “hello.cu” CUDA program on the Proxmox VE 8 container, run the following commands: $ nvcc hello.cu -o hello Now, you can run the “hello” CUDA program on the Proxmox VE 8 container as follows: $ ./hello If the Proxmox VE 8 container can use the NVIDIA GPU for NVIDIA CUDA acceleration, the program will print two lines as shown in the following screenshot. If the NVIDIA GPU is not accessible from the Proxmox VE 8 container, the program will print only the first line which is “Hello world from the CPU!”, not the second line. Conclusion In this article, we showed you how to passthrough an NVIDIA GPU from the Proxmox VE 8 host to a Proxmox VE 8 LXC container. We also showed you how to install the same version of the NVIDIA GPU drivers on the Proxmox VE 8 container as the Proxmox VE host. Finally, we showed you how to install NVIDIA CUDA and NVIDIA cuDNN on an Ubuntu 22.04 LTS Proxmox VE 8 container and compile and run a simple NVIDIA CUDA program on the Proxmox VE 8 container. References: Journey to Deep Learning: Nvidia GPU passthrough to LXC Container | by Mamy André-Ratsimbazafy | Medium How to Install CUDA on Ubuntu 22.04 LTS View the full article
 -
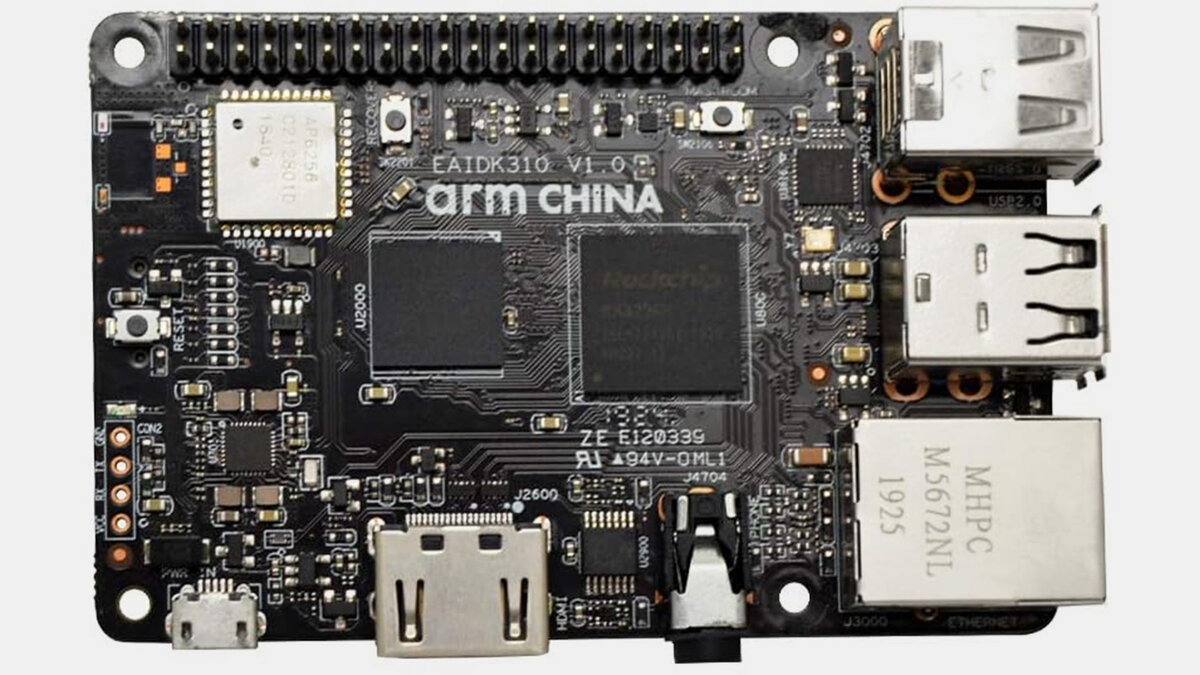
 Arm China continues to silently strengthen its product stack, now has an AI developers board and open-source drivers for its NPU design. View the full article
-
 Google.org, Google's charitable arm, has unveiled a new initiative to support nonprofit organizations in harnessing the power of generative AI technology for impactful projects. The Google.org Accelerator: Generative AI program is designed to help nonprofits develop new solutions to address pressing social challenges with the help of generative AI. The report cites Google.org research, which revealed that four in five nonprofits believe generative AI could be relevant to their work, but only around half are using it. Google.org AI accelerator Google.org says the main challenges to AI adoption are a lack of tools, awareness, training, and funding. The six-month accelerator program is designed to support nonprofits in developing high-impact generative AI applications to address these challenges. The selected projects will cover a wide range of social impact initiatives, including access to public benefits, educational support for underserved communities, misinformation and language translation for refugees. The program's participants will benefit from technical training, workshops, mentorship, and support from dedicated AI coaches. Google.org has also revealed more than $20 million in funding to support the projects undertaken by nonprofit participants. Annie Lewin, Director of Global Advocacy at Google.org, emphasized the potential of generative AI to empower social impact projects, stating: “Generative AI can help social impact teams be more productive, creative and effective in serving their communities. In fact, Google.org funding recipients report that AI helps them achieve their goals in one third of the time at nearly half the cost.” When the technology first gained attention around 18 months ago, concerns were raised about its potentially uncontrollable power and its impact on the human workforce. However, Google.org’s accelerator program demonstrates how the world’s organizations can use AI for social good. More from TechRadar Pro These are the best AI tools and best AI writersWe’ve rounded up the best online collaboration toolsGoogle and the EDF want to track methane emissions from space View the full article

-
Forum Statistics
43.6k
Total Topics43.2k
Total Posts